1. Please bring one photo taken inside or within the college, 3R with boarder. Use your DIGITAL CAMERA and not your awesome cellular phones. Take one full shot of any subject of your choice. This should be pasted on a clean, short bond paper.
2. Bring the following:
3 white cartolinas
pair of scissors
10 news article cutouts from old newspapers (preferably broadsheet; this will be per group basis)
picture cutouts (photographs that can be used as type of photos for news; please do not bring photos from fashion/travel magazines)
glue
old newspaper (one per group)
Groups 4 and 5 - You will have your presentation on March 06, 2010.
Rozeann - Please send me the soft copy of written reports not later than Wednesday, 02.24.2010. I will just get the hard copy on our next meeting.
Monday, February 22, 2010
IMPORTANT ANNOUNCEMENT
Guys,
This is what you have ever hoped for.
We might not have our class this coming Saturday, 02.27.2010.
Dessa - Please confirm with the department if this is still related to the National Games. Text me for the update.
As of this writing, there are 27 albums uploaded for Valentine's Day and Chinese New Year on our online gallery. How about the rest? Last day for uploading of photos will be on Wednesday, 02.24.2010.
Regards,
Sir Edong :)
Friday, February 19, 2010
REQUIREMENTS LONG OVERDUE
Class,
Since we are having long and extended vacation, we have some requirements that were not submitted on time. You might want to follow the ff:
For Portfolio
I have already selected the best portfolio for binding (hard bound).
Rush Hour Michael Joe Delizo
Chinatown Arianne Palma and Krystal Sinay
Poverty Kim Reyes
Quiapo Dennis Aguete and Marjorie Velasquez
Luneta Julie Ann Virata and Edyssa Obemio
Julie Ann - Please work with the group and come up with the best layout for the portfolio. I want the group to use a design that is customary for the portfolio. I also suggest that for each theme, there should be a blank page where the theme (ex: Luneta) will reflect. Instead of using wallet size prints, you will be reproducing the photos and this time it all should be 3R, with boarder. Two photos per page will do. I also want the photos to have the same placements per page.
Note : For those who hasn't submitted their portfolio, please work on it the soonest. Otherwise you will be having INC on your classcard. Portfolio must be submitted on Monday, Feb 22. I will text Dessa for the details as to where you will submit the portfolio. You may now get all your porfolio at the faculty room.
For Chinese New Year and Valentine's Day
Please upload all your photos on our online gallery NOT LATER THAN SUNDAY, Feb 21. Please mirror Rozanne's format. Copies of photos will be submitted on our next class.
Group 4 and 5
We will have the presentation on our next meeting. The workshop will be conducted on March 6 or March 13.
Rozanne - I will be sending you an email over the weekend with regards to the result of the mid term examination. Discussion will include areas where we need to focus on the workshop based on the lowest number of scores per topic.
Final Examination will be discussed on our next meeting.
I will see you all on Saturday. Same time. Same place. Same faces :)
p.s. for any questions/clarifications, you may direct all your queries to Dessa.
Regards,
Sir Edong :)
Saturday, February 13, 2010
Feb. 14 , 2010 Photo Journalism
Good Day!
Kindly upload your new pictures in the Chinese New Year/Valentines Day Folder. The album will be now created individually, entitle it in your full name. (eg. Delizo, Michael Joe T.)
Thanks!
-Michael Joe
Kindly upload your new pictures in the Chinese New Year/Valentines Day Folder. The album will be now created individually, entitle it in your full name. (eg. Delizo, Michael Joe T.)
Thanks!
-Michael Joe
Monday, February 8, 2010
By-lines
Bylines tell who wrote an article.
They are a small element in books, magazines, newspaper, or newsletter design but certainly important to the author. In some cases, bylines may be used to give credit for photographs or illustrations.
Designing Bylines
They are a small element in books, magazines, newspaper, or newsletter design but certainly important to the author. In some cases, bylines may be used to give credit for photographs or illustrations.
Designing Bylines
- Bylines should usually be kept simple and non-obtrusive.
- Bylines should be distinct from the headlines and body copy but shouldn't stand out too much.
- Use size, typestyle, color, embellishments, and alignment to differentiate bylines from other nearby article elements such as headlines, datelines, decks, kickers, and body copy.
- Use a smaller font than the headline and subtitles.
- Bylines are often prefaced by the word "By" or sometimes "Written by" which could be capitalized or kept all lowercase. "Photographed by" or "Illustrated by" may preface other types of credit lines.
- Bylines can be accompanied by additional descriptive text pertinent to the article itself including a copyright notice, revision notice, or indication that the article was previously published or a reprint. These can appear on the same line or separate lines such as:
- Bylines can be aligned left, right, or centered.
Sunday, February 7, 2010
Retouching Pictures
Uses
- Photographic retouching is usually limited to the removal of dust and scratch marks on the finished prints.
- Enhancements tend to keep the photo realistic and just enhanced from the original photo taken.
- Retouching must not affect the subject or the message your photo is trying to convey.
- Retouching should be done discreetly or it might lead to serious legitimate complains from those involved in the photo.
- Photo retouching for press focuses on the enhancement of the photo and not photo manipulation.
Methods
Manual
Airbrushing
Airbrushing is one way of retouching photos manually. Through airbrushing, you can remove unnecessary things from the background. It is possible to airbrush out a distracting background, draw a dark line to accentuate the border between two areas of equal tone, subdue a highlight or lighten a shadow. In extreme cases, you can even remove a person from the picture completely or move two people closer together.
Digital
Color Correction
Color correction changes the values of your image’s color channels to achieve different retouching results. We can work with images in CMYK or RGB mode.


Image Enhancing
Image enhancing is in the subtle end of the image manipulation scale. Aside from improving specific areas of an image such as removing dirt, stains and saturating de-saturated colors, image enhancing can also mean the subtle insertion of sub-images in a bigger picture for effect. In our sample, clouds were added to the original picture aside from the colors being enhanced.


Logo Works
Logo Work entails outlining logos using the vector graphics software.


Other basic retouching
Sharpening
Sharpens images for better printing and view

Hue & Saturation
Saturates color and adjusts hue for contrast and vividness

Retouching Rules
- Never paint in what you cannot discern on the original print. Don’t become a painter inventing detail you cannot see.
- Never turn a print upside down when you are touching up. You will lose track and paint out something you should have kept in.
- Aim to take out extraneous detail. Aim to bring out the central foreground figure by edging the figure with a grey line – do not, then, edge in the background figure.
- Try to match grey paint you mix from the black and whit inks to match the background.
- On faces, if you must touch them, use a pale, grey as much as possible.
- Wire pictures “streaks” can be painted out in color to suit the background.
- Action pictures are often better for the blur. There is realism about an untouched print which a touched-up print, for all its extra clarity, can often not gainsay.
Reversing Pictures
This technique should be used with great care. Readers will notice if the face of a familiar person is reversed. Any picture which is reversed and contains letters or numbers, cars driving down the road or anybody wearing a wedding ring will also be spotted by the eagle-eyed.
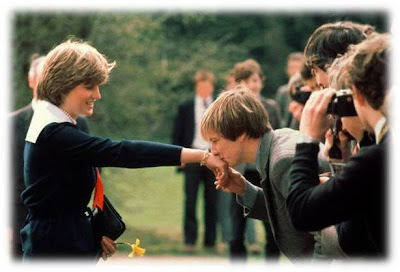 Reversing or ‘flipping’ a photograph may be done to improve the layout of a page, but it must be done with extreme care. In the picture, you can obviously tell which picture was ‘flipped’ and which one is used the correct way around.
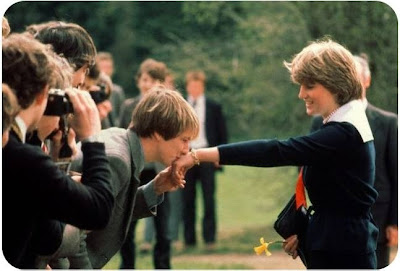
People shake hands with their right hand – and gentlemen’s jackets have a breast pocket on the left-hand side.
 Reversing or ‘flipping’ a photograph may be done to improve the layout of a page, but it must be done with extreme care. In the picture, you can obviously tell which picture was ‘flipped’ and which one is used the correct way around.
People shake hands with their right hand – and gentlemen’s jackets have a breast pocket on the left-hand side.
Picture Cutouts and Dropouts
Cutouts
Using pictures as rectangles of different shapes simplifies the design and production process.
The unwanted material around all or part of the subject is removed, either electronically or by graphic artist, and the text is arranged to ‘flow’ around the picture.

A cutout removes the background from a picture – as, for instance, in this picture of a model. The space ‘saved’ can then be filled with text.

Sometimes the text is set over lines of varying length so that it ‘flows’ around the picture, rather than in specific columns, as in this case.
Dropouts
 The dropout – or bleach-out - process eliminates tones from a picture, leaving it as a stark black and white image. It is suitable for feature pages, especially for a picture in which the identity of the people involved needs to be concealed.
Resizing Pictures
How To Resize Microsoft Paint Pictures
Step 1
Point your cursor to start, press run and type "mspaint" into the dialogue box.
Step 2
On the program hit the file button, go to open, and select the Microsoft paint pictures that you would like to edit.
Step 3
On top press image and select stretch/skew. Alternatively you can hit ctrl + w.
Step 4
To adjust the width of Microsoft paint pictures, enter a higher or lower number in the horizontal box and press OK.
Step 5
To adjust the height of Microsoft paint pictures, enter a higher or lower number in the vertical section and click OK.

Advanced features
Image Resizer includes some additional advanced features. Click the Advanced tab to show the following options:
You can resize your photos by exporting, emailing, or uploading your photos
The result is newly resized copies of your photos, saved to your hard drive. During the export process, you can adjust both the "Image Size Options" and the "Image Quality" settings in the "Export to Folder" screen.
If you're sharing a large number of photos, you may not want to upload all of the photos at their original size.
Step 1
Point your cursor to start, press run and type "mspaint" into the dialogue box.
Step 2
On the program hit the file button, go to open, and select the Microsoft paint pictures that you would like to edit.
Step 3
On top press image and select stretch/skew. Alternatively you can hit ctrl + w.
Step 4
To adjust the width of Microsoft paint pictures, enter a higher or lower number in the horizontal box and press OK.
Step 5
To adjust the height of Microsoft paint pictures, enter a higher or lower number in the vertical section and click OK.
- Resize Digital Pictures Quickly
- Open the folder that contains the pictures you want to resize. In Thumbnail view, right-click any picture you want to resize, and click Resize Pictures.
- In the Resize Pictures dialog box, click the size you want your photo to be, and click OK. In general, Small is a good selection for most of your needs, such as e-mailing pictures or posting them to a Web site.
- The original file is still intact and a new, resized file has been added to the same folder.


- Resize multiple photos at once
Advanced features
Image Resizer includes some additional advanced features. Click the Advanced tab to show the following options:
- Custom lets you manually set the size you want for your photos.\
- Make pictures smaller but not larger constrains resizing to only sizes smaller than the original photo.
- Resize the original pictures (don't create copies) permanently applies resizing to your original photo.
You can resize your photos by exporting, emailing, or uploading your photos
- Resize by exporting
The result is newly resized copies of your photos, saved to your hard drive. During the export process, you can adjust both the "Image Size Options" and the "Image Quality" settings in the "Export to Folder" screen.
- Resize by emailing
- Resize by uploading to Web Albums
If you're sharing a large number of photos, you may not want to upload all of the photos at their original size.
Cropping Pictures
STEP 1 Photo Cropping Tools
Not all photo editing tools are created equal. Some are designed to be one-stop solutions and others are for more advanced techniques.
STEP 2 Steps to Crop a Picture
When cropping a picture:
STEP 3 Landscape Cropping Tips
If you shoot landscapes the concept of cropping can be utilized to eliminate distracting background or foreground elements.
Cropping a landscape image can also mean changing the focus of the subject or even adjusting the horizon. Cropping can help to create focus in an otherwise bland photograph. It can also be used to change the orientation of an image, from horizontal to vertical.
STEP 4 Portrait Cropping Tips
STEP 5 General Photo Cropping Tips
STEP 6 How to Minimize Cropping
When you are shooting an image, look around the frame before you take it, eliminate or "crop" out any areas that are undesirable by zooming or stepping to one side or another.
By "cropping" a picture when shooting the image, you eliminate the need for further processing later on.
Not all photo editing tools are created equal. Some are designed to be one-stop solutions and others are for more advanced techniques.
- GIMP - open source photo editing software – FREE
- Snapfish - basic photo editing tools – FREE
- Photoshop CS3 - best advanced photo editing software available - $649
- Photoshop Elements - basic photo editing software - $99.99
- Corel Paint Shop Pro - basic photo editing software - $79.99
STEP 2 Steps to Crop a Picture
When cropping a picture:
- Identify what the subject is.
- What is the focal point?
- Identify what the subject is not.
- Is the background a distraction? Does it add anything to the subject in terms of context? Is it necessary?
STEP 3 Landscape Cropping Tips
If you shoot landscapes the concept of cropping can be utilized to eliminate distracting background or foreground elements.
Cropping a landscape image can also mean changing the focus of the subject or even adjusting the horizon. Cropping can help to create focus in an otherwise bland photograph. It can also be used to change the orientation of an image, from horizontal to vertical.
STEP 4 Portrait Cropping Tips
- Never crop a person at a joint (elbow, knee, wrist, or ankle). Instead try cropping the image between the joint
- When photographing an overweight individual, head and shoulder shots are best. You can crop a full length shot to include only the head and shoulders of the subjects. This will also create a closer up image, allowing you to see faces and expressions better.
STEP 5 General Photo Cropping Tips
- Try not to put the subject directly in the middle of the photograph and adhere to the rule of thirds.
- Look for lines and shapes in your image. Try and place the lines so they are leading your eyes into the image not out of it. This is especially important if your subject is a person.
STEP 6 How to Minimize Cropping
When you are shooting an image, look around the frame before you take it, eliminate or "crop" out any areas that are undesirable by zooming or stepping to one side or another.
By "cropping" a picture when shooting the image, you eliminate the need for further processing later on.
Thursday, February 4, 2010
Picture Spreads
There are events – royal weddings, village carnivals and dramatic rooftop rescues – when pictures tell the story and a paper uses them to fill a complete page or more. In laying out stories, one should be selected as the ‘lead’ or main picture and the others used at a smaller size. Readability studies have shown that pictures are one of the most popular elements in a newspaper. For that reason alone, important pictures should be large and positioned in a manner that maximizes their display.
Pictures of two-column widths or more should be placed on a page so they stand or hang from something that gives them support. Pictures and headlines that are not related should be separated by more than a rule, if the possibility exists that, when placed together, they are humorous or in bad taste.
Avoid any clashing items. For example, do not place an accident story next to a mortuary advertisement. (Discuss the placement of advertisements with your editor or the CE newspaper publisher.)
Do not give a picture more display space than it deserves, especially a "mug shot" (portrait-type, close-up photograph of an individual). Mug shots can float in copy, but it is best if they stand on or hang from something. If a mug shot floats, it is best to float it within a sentence in a paragraph. Mug shots should be accompanied by at least a name line for identification. By omitting the name line, the reader is forced into trying to identify the individual in the picture.
Try to avoid running pictures on the horizontal fold of a newspaper, because the area along the fold becomes distorted once the newspaper has been folded.
Laying-out
The importance of laying-out or make-up can be gleaned from the fact that a newspaper is like any commodity, commercial for a matter, which will sell if it can prove its utility and attraction to the prospective buyer. The same thing is true with the news. If the newspaper does not attract buyers, then it will fold up in no time at all.
In making the lay-out of the newspaper, we must be also guided by a known as dummy. A dummy sheet is a piece of paper which has measurement in length and depth and will determine more or less page.
In making the lay-out of the newspaper, we must be also guided by a known as dummy. A dummy sheet is a piece of paper which has measurement in length and depth and will determine more or less page.
Types of Lay-outs
Symmetrical lay-out - the deskman is always governed strictly by the laws of symmetry, but this is not true in the case of an informal balance.
Quadrant make-up – divides the newspaper page into four parts. Each quarter has its own story.
Horizontal make-up – the appearance of the page is horizontal rectangles the effect on the eyes is made by multi-column heads.
Circus make-up – no symmetry and there are star performers, like a sensational picture or a boxed human interest story.
Brace make-up – is characterized by angular shelf-like arrangement of content. The deskman usually projects the effect by making a four column-head, that is what you call a red-out or a drop-head of, two or three columns. The story follows below and at the top is shelf.
How to Select Photos
Questions that will be answered by the picture editor:
Pointers in selecting out pictures:
- How does the photograph classify, is it a feature or news picture? If it will “save” for a month or two, it is probably a feature picture. If it synchronizes with the day’s news, it is a news picture.
- Is it forbidden matter such as lottery or raffle? Is it salacious or otherwise improper for public display?
- What elements give the picture news or feature value? How unusual is the news event that is pictured?
- Does the picture simply illustrate- or does it tells a story?
- Is it blurry, furred out of focus and not printable?
- How large a cut should be made of the picture? Are there parts that could and should be eliminated?
- What shall be its position and setting in the newspaper? On what page and at the top of what columns shall it be placed? What captions and texts does it require to show off its advantages?
Pointers in selecting out pictures:
- Photos should be cropped to eliminate unnecessary detail and to focus attention on the theme.
- A photo should not lie right next to a heavily-shaded ad.
- Multiple column photos as a rule be in the upper left hand corner.
- Crowded, posed photograph should be avoided.
- Retouch whenever necessary, radio-photos specially, but leave this technical detail to the staff artist.
- If you think a photo should be displayed two columns ask yourself if it wont look handsomer in three. Same goes for three.
- Unless very necessary don’t soften the impact of a photo with worked-in arrows, broken lines, super impositions or any kind of additional pointers not originally in the photo.
- Have your photos scaled correctly.
- If the dominant figure in a photo doesn’t face the page, or the story direct the engraving department to reverse the film.
- When making out orders for photos, be sure that caption goes with photograph.
- Allot space in your dummy for caption material.
- The back of the photo should carry pertinent legend: width and height or depth of cut, slug or label, and page.
- A final check before tossing the stuff in the basket may save you a lot of trouble, too.
- Don’t forget the caption lead-in or the display line or whatever style your paper has adopted.
Sample News Photographs
 Feature Photo
Taking the Plunge
A man prepares to dip in the icy Ob River in Russia's Siberian city of Novosibirsk, with the air temperature at about minus 22 degrees Fahrenheit, during an Orthodox Epiphany celebration on Jan.19. Orthodox Christians believe the annual swim cleanses them of sin and protects their health.
 News Photo
Surrounded by the Law
Protesters clash with police Jan. 20 near the courthouse in Amfissa, northwest of Athens, where two police officers are standing trial on homicide charges for the fatal shooting of a teenager in December 2008. The shooting sparked Greece's worst riots in decades.

News Photo
A mother's agony
Armante Cherisma cries in front of the body of her 15-year-old daughter, who was killed by a policeman responding to reports of lootings on a street in Port-au-Prince on Jan. 19.
 News-Feature Photo
Military formation
Indian soldiers form a human pyramid on motorcycles during a rehearsal for the Republic Day parade in New Delhi on Jan. 18. India celebrates its Republic Day on Jan. 26.
Tuesday, February 2, 2010
Using Pictures for News
The News Photographs
The topic we are going to discuss is the news pictures for the daily newspapers. Timeliness is the prime factor in news, whether it will be reported by the writer or the photographer. And just as there are news stories and feature stories, with an in-between hybrid called news-feature stories, so there are news and feature and news-feature photos.
--------------------------------------------------------------
The News Pictures
A news picture is one that illustrates news of the day or, in case of events at distant points, provides the first available illustration. There are three kinds of pictures:
--------------------------------------------------------------
The Feature Photos
A feature picture purport to show lighter and less urgent phases of the human drama. The news picture has the quality of immediacy; it demands to be published; if it is not published on receipt by one newspaper, a competitor will use it, which means its value is spoiled for the tardy one. The Feature picture has no such urgency.
--------------------------------------------------------------
The News-Feature Photos
This type of photograph is rich in human interest but with only a minor reliance for its importance upon the news to be classed as a news feature picture. It tells no important news, yet, if not use quite promptly, is of no value.
Sources of Pictures
There are various sources of pictures to be used by the editorial staff of the different newspapers. Each publication, irrespective of the size and staff of the newspaper, has its own photographers including a photo laboratory and its accessories. News agencies also provide news-photos to their respective clients. Such pictures may be positives (direct from wire-photo or telephoto receivers, prints made from negatives received at the national bureau and delivered to the clients), mats (usually mailed to the clients), negatives (for color pictures or facsimiles.) Engravings can be made from pictures transcribed from facsimile, thus eliminating the necessity of waiting for prints from negatives. Facsimile is especially geared to newspapers that do not have wire-photo or telephoto receivers.
Other important sources of news photos are the government offices, the ministry of public information, the public information sections and or offices of the various public and private institutions, business offices, banking institutions, the different media networks and advertising agencies.
Next post will have some sample pictures, watch out! :)
The topic we are going to discuss is the news pictures for the daily newspapers. Timeliness is the prime factor in news, whether it will be reported by the writer or the photographer. And just as there are news stories and feature stories, with an in-between hybrid called news-feature stories, so there are news and feature and news-feature photos.
--------------------------------------------------------------
The News Pictures
A news picture is one that illustrates news of the day or, in case of events at distant points, provides the first available illustration. There are three kinds of pictures:
- the picture that shows the news happening;
- the picture of the agency or site or result of the event; and
- the personality shot, preferably with a spot news picture.
--------------------------------------------------------------
The Feature Photos
A feature picture purport to show lighter and less urgent phases of the human drama. The news picture has the quality of immediacy; it demands to be published; if it is not published on receipt by one newspaper, a competitor will use it, which means its value is spoiled for the tardy one. The Feature picture has no such urgency.
--------------------------------------------------------------
The News-Feature Photos
This type of photograph is rich in human interest but with only a minor reliance for its importance upon the news to be classed as a news feature picture. It tells no important news, yet, if not use quite promptly, is of no value.
Sources of Pictures
There are various sources of pictures to be used by the editorial staff of the different newspapers. Each publication, irrespective of the size and staff of the newspaper, has its own photographers including a photo laboratory and its accessories. News agencies also provide news-photos to their respective clients. Such pictures may be positives (direct from wire-photo or telephoto receivers, prints made from negatives received at the national bureau and delivered to the clients), mats (usually mailed to the clients), negatives (for color pictures or facsimiles.) Engravings can be made from pictures transcribed from facsimile, thus eliminating the necessity of waiting for prints from negatives. Facsimile is especially geared to newspapers that do not have wire-photo or telephoto receivers.
Other important sources of news photos are the government offices, the ministry of public information, the public information sections and or offices of the various public and private institutions, business offices, banking institutions, the different media networks and advertising agencies.
Next post will have some sample pictures, watch out! :)
Subscribe to:
Posts (Atom)