1. Please bring one photo taken inside or within the college, 3R with boarder. Use your DIGITAL CAMERA and not your awesome cellular phones. Take one full shot of any subject of your choice. This should be pasted on a clean, short bond paper.
2. Bring the following:
3 white cartolinas
pair of scissors
10 news article cutouts from old newspapers (preferably broadsheet; this will be per group basis)
picture cutouts (photographs that can be used as type of photos for news; please do not bring photos from fashion/travel magazines)
glue
old newspaper (one per group)
Groups 4 and 5 - You will have your presentation on March 06, 2010.
Rozeann - Please send me the soft copy of written reports not later than Wednesday, 02.24.2010. I will just get the hard copy on our next meeting.
Monday, February 22, 2010
IMPORTANT ANNOUNCEMENT
Guys,
This is what you have ever hoped for.
We might not have our class this coming Saturday, 02.27.2010.
Dessa - Please confirm with the department if this is still related to the National Games. Text me for the update.
As of this writing, there are 27 albums uploaded for Valentine's Day and Chinese New Year on our online gallery. How about the rest? Last day for uploading of photos will be on Wednesday, 02.24.2010.
Regards,
Sir Edong :)
Friday, February 19, 2010
REQUIREMENTS LONG OVERDUE
Class,
Since we are having long and extended vacation, we have some requirements that were not submitted on time. You might want to follow the ff:
For Portfolio
I have already selected the best portfolio for binding (hard bound).
Rush Hour Michael Joe Delizo
Chinatown Arianne Palma and Krystal Sinay
Poverty Kim Reyes
Quiapo Dennis Aguete and Marjorie Velasquez
Luneta Julie Ann Virata and Edyssa Obemio
Julie Ann - Please work with the group and come up with the best layout for the portfolio. I want the group to use a design that is customary for the portfolio. I also suggest that for each theme, there should be a blank page where the theme (ex: Luneta) will reflect. Instead of using wallet size prints, you will be reproducing the photos and this time it all should be 3R, with boarder. Two photos per page will do. I also want the photos to have the same placements per page.
Note : For those who hasn't submitted their portfolio, please work on it the soonest. Otherwise you will be having INC on your classcard. Portfolio must be submitted on Monday, Feb 22. I will text Dessa for the details as to where you will submit the portfolio. You may now get all your porfolio at the faculty room.
For Chinese New Year and Valentine's Day
Please upload all your photos on our online gallery NOT LATER THAN SUNDAY, Feb 21. Please mirror Rozanne's format. Copies of photos will be submitted on our next class.
Group 4 and 5
We will have the presentation on our next meeting. The workshop will be conducted on March 6 or March 13.
Rozanne - I will be sending you an email over the weekend with regards to the result of the mid term examination. Discussion will include areas where we need to focus on the workshop based on the lowest number of scores per topic.
Final Examination will be discussed on our next meeting.
I will see you all on Saturday. Same time. Same place. Same faces :)
p.s. for any questions/clarifications, you may direct all your queries to Dessa.
Regards,
Sir Edong :)
Saturday, February 13, 2010
Feb. 14 , 2010 Photo Journalism
Good Day!
Kindly upload your new pictures in the Chinese New Year/Valentines Day Folder. The album will be now created individually, entitle it in your full name. (eg. Delizo, Michael Joe T.)
Thanks!
-Michael Joe
Kindly upload your new pictures in the Chinese New Year/Valentines Day Folder. The album will be now created individually, entitle it in your full name. (eg. Delizo, Michael Joe T.)
Thanks!
-Michael Joe
Monday, February 8, 2010
By-lines
Bylines tell who wrote an article.
They are a small element in books, magazines, newspaper, or newsletter design but certainly important to the author. In some cases, bylines may be used to give credit for photographs or illustrations.
Designing Bylines
They are a small element in books, magazines, newspaper, or newsletter design but certainly important to the author. In some cases, bylines may be used to give credit for photographs or illustrations.
Designing Bylines
- Bylines should usually be kept simple and non-obtrusive.
- Bylines should be distinct from the headlines and body copy but shouldn't stand out too much.
- Use size, typestyle, color, embellishments, and alignment to differentiate bylines from other nearby article elements such as headlines, datelines, decks, kickers, and body copy.
- Use a smaller font than the headline and subtitles.
- Bylines are often prefaced by the word "By" or sometimes "Written by" which could be capitalized or kept all lowercase. "Photographed by" or "Illustrated by" may preface other types of credit lines.
- Bylines can be accompanied by additional descriptive text pertinent to the article itself including a copyright notice, revision notice, or indication that the article was previously published or a reprint. These can appear on the same line or separate lines such as:
- Bylines can be aligned left, right, or centered.
Sunday, February 7, 2010
Retouching Pictures
Uses
- Photographic retouching is usually limited to the removal of dust and scratch marks on the finished prints.
- Enhancements tend to keep the photo realistic and just enhanced from the original photo taken.
- Retouching must not affect the subject or the message your photo is trying to convey.
- Retouching should be done discreetly or it might lead to serious legitimate complains from those involved in the photo.
- Photo retouching for press focuses on the enhancement of the photo and not photo manipulation.
Methods
Manual
Airbrushing
Airbrushing is one way of retouching photos manually. Through airbrushing, you can remove unnecessary things from the background. It is possible to airbrush out a distracting background, draw a dark line to accentuate the border between two areas of equal tone, subdue a highlight or lighten a shadow. In extreme cases, you can even remove a person from the picture completely or move two people closer together.
Digital
Color Correction
Color correction changes the values of your image’s color channels to achieve different retouching results. We can work with images in CMYK or RGB mode.


Image Enhancing
Image enhancing is in the subtle end of the image manipulation scale. Aside from improving specific areas of an image such as removing dirt, stains and saturating de-saturated colors, image enhancing can also mean the subtle insertion of sub-images in a bigger picture for effect. In our sample, clouds were added to the original picture aside from the colors being enhanced.


Logo Works
Logo Work entails outlining logos using the vector graphics software.


Other basic retouching
Sharpening
Sharpens images for better printing and view

Hue & Saturation
Saturates color and adjusts hue for contrast and vividness

Retouching Rules
- Never paint in what you cannot discern on the original print. Don’t become a painter inventing detail you cannot see.
- Never turn a print upside down when you are touching up. You will lose track and paint out something you should have kept in.
- Aim to take out extraneous detail. Aim to bring out the central foreground figure by edging the figure with a grey line – do not, then, edge in the background figure.
- Try to match grey paint you mix from the black and whit inks to match the background.
- On faces, if you must touch them, use a pale, grey as much as possible.
- Wire pictures “streaks” can be painted out in color to suit the background.
- Action pictures are often better for the blur. There is realism about an untouched print which a touched-up print, for all its extra clarity, can often not gainsay.
Reversing Pictures
This technique should be used with great care. Readers will notice if the face of a familiar person is reversed. Any picture which is reversed and contains letters or numbers, cars driving down the road or anybody wearing a wedding ring will also be spotted by the eagle-eyed.
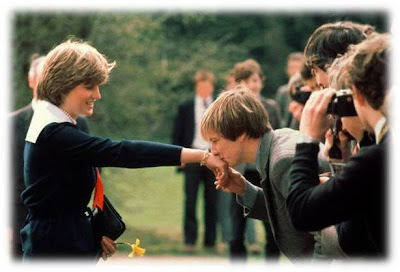 Reversing or ‘flipping’ a photograph may be done to improve the layout of a page, but it must be done with extreme care. In the picture, you can obviously tell which picture was ‘flipped’ and which one is used the correct way around.
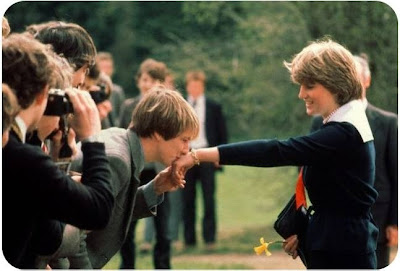
People shake hands with their right hand – and gentlemen’s jackets have a breast pocket on the left-hand side.
 Reversing or ‘flipping’ a photograph may be done to improve the layout of a page, but it must be done with extreme care. In the picture, you can obviously tell which picture was ‘flipped’ and which one is used the correct way around.
People shake hands with their right hand – and gentlemen’s jackets have a breast pocket on the left-hand side.
Picture Cutouts and Dropouts
Cutouts
Using pictures as rectangles of different shapes simplifies the design and production process.
The unwanted material around all or part of the subject is removed, either electronically or by graphic artist, and the text is arranged to ‘flow’ around the picture.

A cutout removes the background from a picture – as, for instance, in this picture of a model. The space ‘saved’ can then be filled with text.

Sometimes the text is set over lines of varying length so that it ‘flows’ around the picture, rather than in specific columns, as in this case.
Dropouts
 The dropout – or bleach-out - process eliminates tones from a picture, leaving it as a stark black and white image. It is suitable for feature pages, especially for a picture in which the identity of the people involved needs to be concealed.
Resizing Pictures
How To Resize Microsoft Paint Pictures
Step 1
Point your cursor to start, press run and type "mspaint" into the dialogue box.
Step 2
On the program hit the file button, go to open, and select the Microsoft paint pictures that you would like to edit.
Step 3
On top press image and select stretch/skew. Alternatively you can hit ctrl + w.
Step 4
To adjust the width of Microsoft paint pictures, enter a higher or lower number in the horizontal box and press OK.
Step 5
To adjust the height of Microsoft paint pictures, enter a higher or lower number in the vertical section and click OK.

Advanced features
Image Resizer includes some additional advanced features. Click the Advanced tab to show the following options:
You can resize your photos by exporting, emailing, or uploading your photos
The result is newly resized copies of your photos, saved to your hard drive. During the export process, you can adjust both the "Image Size Options" and the "Image Quality" settings in the "Export to Folder" screen.
If you're sharing a large number of photos, you may not want to upload all of the photos at their original size.
Step 1
Point your cursor to start, press run and type "mspaint" into the dialogue box.
Step 2
On the program hit the file button, go to open, and select the Microsoft paint pictures that you would like to edit.
Step 3
On top press image and select stretch/skew. Alternatively you can hit ctrl + w.
Step 4
To adjust the width of Microsoft paint pictures, enter a higher or lower number in the horizontal box and press OK.
Step 5
To adjust the height of Microsoft paint pictures, enter a higher or lower number in the vertical section and click OK.
- Resize Digital Pictures Quickly
- Open the folder that contains the pictures you want to resize. In Thumbnail view, right-click any picture you want to resize, and click Resize Pictures.
- In the Resize Pictures dialog box, click the size you want your photo to be, and click OK. In general, Small is a good selection for most of your needs, such as e-mailing pictures or posting them to a Web site.
- The original file is still intact and a new, resized file has been added to the same folder.


- Resize multiple photos at once
Advanced features
Image Resizer includes some additional advanced features. Click the Advanced tab to show the following options:
- Custom lets you manually set the size you want for your photos.\
- Make pictures smaller but not larger constrains resizing to only sizes smaller than the original photo.
- Resize the original pictures (don't create copies) permanently applies resizing to your original photo.
You can resize your photos by exporting, emailing, or uploading your photos
- Resize by exporting
The result is newly resized copies of your photos, saved to your hard drive. During the export process, you can adjust both the "Image Size Options" and the "Image Quality" settings in the "Export to Folder" screen.
- Resize by emailing
- Resize by uploading to Web Albums
If you're sharing a large number of photos, you may not want to upload all of the photos at their original size.
Cropping Pictures
STEP 1 Photo Cropping Tools
Not all photo editing tools are created equal. Some are designed to be one-stop solutions and others are for more advanced techniques.
STEP 2 Steps to Crop a Picture
When cropping a picture:
STEP 3 Landscape Cropping Tips
If you shoot landscapes the concept of cropping can be utilized to eliminate distracting background or foreground elements.
Cropping a landscape image can also mean changing the focus of the subject or even adjusting the horizon. Cropping can help to create focus in an otherwise bland photograph. It can also be used to change the orientation of an image, from horizontal to vertical.
STEP 4 Portrait Cropping Tips
STEP 5 General Photo Cropping Tips
STEP 6 How to Minimize Cropping
When you are shooting an image, look around the frame before you take it, eliminate or "crop" out any areas that are undesirable by zooming or stepping to one side or another.
By "cropping" a picture when shooting the image, you eliminate the need for further processing later on.
Not all photo editing tools are created equal. Some are designed to be one-stop solutions and others are for more advanced techniques.
- GIMP - open source photo editing software – FREE
- Snapfish - basic photo editing tools – FREE
- Photoshop CS3 - best advanced photo editing software available - $649
- Photoshop Elements - basic photo editing software - $99.99
- Corel Paint Shop Pro - basic photo editing software - $79.99
STEP 2 Steps to Crop a Picture
When cropping a picture:
- Identify what the subject is.
- What is the focal point?
- Identify what the subject is not.
- Is the background a distraction? Does it add anything to the subject in terms of context? Is it necessary?
STEP 3 Landscape Cropping Tips
If you shoot landscapes the concept of cropping can be utilized to eliminate distracting background or foreground elements.
Cropping a landscape image can also mean changing the focus of the subject or even adjusting the horizon. Cropping can help to create focus in an otherwise bland photograph. It can also be used to change the orientation of an image, from horizontal to vertical.
STEP 4 Portrait Cropping Tips
- Never crop a person at a joint (elbow, knee, wrist, or ankle). Instead try cropping the image between the joint
- When photographing an overweight individual, head and shoulder shots are best. You can crop a full length shot to include only the head and shoulders of the subjects. This will also create a closer up image, allowing you to see faces and expressions better.
STEP 5 General Photo Cropping Tips
- Try not to put the subject directly in the middle of the photograph and adhere to the rule of thirds.
- Look for lines and shapes in your image. Try and place the lines so they are leading your eyes into the image not out of it. This is especially important if your subject is a person.
STEP 6 How to Minimize Cropping
When you are shooting an image, look around the frame before you take it, eliminate or "crop" out any areas that are undesirable by zooming or stepping to one side or another.
By "cropping" a picture when shooting the image, you eliminate the need for further processing later on.
Thursday, February 4, 2010
Picture Spreads
There are events – royal weddings, village carnivals and dramatic rooftop rescues – when pictures tell the story and a paper uses them to fill a complete page or more. In laying out stories, one should be selected as the ‘lead’ or main picture and the others used at a smaller size. Readability studies have shown that pictures are one of the most popular elements in a newspaper. For that reason alone, important pictures should be large and positioned in a manner that maximizes their display.
Pictures of two-column widths or more should be placed on a page so they stand or hang from something that gives them support. Pictures and headlines that are not related should be separated by more than a rule, if the possibility exists that, when placed together, they are humorous or in bad taste.
Avoid any clashing items. For example, do not place an accident story next to a mortuary advertisement. (Discuss the placement of advertisements with your editor or the CE newspaper publisher.)
Do not give a picture more display space than it deserves, especially a "mug shot" (portrait-type, close-up photograph of an individual). Mug shots can float in copy, but it is best if they stand on or hang from something. If a mug shot floats, it is best to float it within a sentence in a paragraph. Mug shots should be accompanied by at least a name line for identification. By omitting the name line, the reader is forced into trying to identify the individual in the picture.
Try to avoid running pictures on the horizontal fold of a newspaper, because the area along the fold becomes distorted once the newspaper has been folded.
Laying-out
The importance of laying-out or make-up can be gleaned from the fact that a newspaper is like any commodity, commercial for a matter, which will sell if it can prove its utility and attraction to the prospective buyer. The same thing is true with the news. If the newspaper does not attract buyers, then it will fold up in no time at all.
In making the lay-out of the newspaper, we must be also guided by a known as dummy. A dummy sheet is a piece of paper which has measurement in length and depth and will determine more or less page.
In making the lay-out of the newspaper, we must be also guided by a known as dummy. A dummy sheet is a piece of paper which has measurement in length and depth and will determine more or less page.
Types of Lay-outs
Symmetrical lay-out - the deskman is always governed strictly by the laws of symmetry, but this is not true in the case of an informal balance.
Quadrant make-up – divides the newspaper page into four parts. Each quarter has its own story.
Horizontal make-up – the appearance of the page is horizontal rectangles the effect on the eyes is made by multi-column heads.
Circus make-up – no symmetry and there are star performers, like a sensational picture or a boxed human interest story.
Brace make-up – is characterized by angular shelf-like arrangement of content. The deskman usually projects the effect by making a four column-head, that is what you call a red-out or a drop-head of, two or three columns. The story follows below and at the top is shelf.
How to Select Photos
Questions that will be answered by the picture editor:
Pointers in selecting out pictures:
- How does the photograph classify, is it a feature or news picture? If it will “save” for a month or two, it is probably a feature picture. If it synchronizes with the day’s news, it is a news picture.
- Is it forbidden matter such as lottery or raffle? Is it salacious or otherwise improper for public display?
- What elements give the picture news or feature value? How unusual is the news event that is pictured?
- Does the picture simply illustrate- or does it tells a story?
- Is it blurry, furred out of focus and not printable?
- How large a cut should be made of the picture? Are there parts that could and should be eliminated?
- What shall be its position and setting in the newspaper? On what page and at the top of what columns shall it be placed? What captions and texts does it require to show off its advantages?
Pointers in selecting out pictures:
- Photos should be cropped to eliminate unnecessary detail and to focus attention on the theme.
- A photo should not lie right next to a heavily-shaded ad.
- Multiple column photos as a rule be in the upper left hand corner.
- Crowded, posed photograph should be avoided.
- Retouch whenever necessary, radio-photos specially, but leave this technical detail to the staff artist.
- If you think a photo should be displayed two columns ask yourself if it wont look handsomer in three. Same goes for three.
- Unless very necessary don’t soften the impact of a photo with worked-in arrows, broken lines, super impositions or any kind of additional pointers not originally in the photo.
- Have your photos scaled correctly.
- If the dominant figure in a photo doesn’t face the page, or the story direct the engraving department to reverse the film.
- When making out orders for photos, be sure that caption goes with photograph.
- Allot space in your dummy for caption material.
- The back of the photo should carry pertinent legend: width and height or depth of cut, slug or label, and page.
- A final check before tossing the stuff in the basket may save you a lot of trouble, too.
- Don’t forget the caption lead-in or the display line or whatever style your paper has adopted.
Sample News Photographs
 Feature Photo
Taking the Plunge
A man prepares to dip in the icy Ob River in Russia's Siberian city of Novosibirsk, with the air temperature at about minus 22 degrees Fahrenheit, during an Orthodox Epiphany celebration on Jan.19. Orthodox Christians believe the annual swim cleanses them of sin and protects their health.
 News Photo
Surrounded by the Law
Protesters clash with police Jan. 20 near the courthouse in Amfissa, northwest of Athens, where two police officers are standing trial on homicide charges for the fatal shooting of a teenager in December 2008. The shooting sparked Greece's worst riots in decades.

News Photo
A mother's agony
Armante Cherisma cries in front of the body of her 15-year-old daughter, who was killed by a policeman responding to reports of lootings on a street in Port-au-Prince on Jan. 19.
 News-Feature Photo
Military formation
Indian soldiers form a human pyramid on motorcycles during a rehearsal for the Republic Day parade in New Delhi on Jan. 18. India celebrates its Republic Day on Jan. 26.
Tuesday, February 2, 2010
Using Pictures for News
The News Photographs
The topic we are going to discuss is the news pictures for the daily newspapers. Timeliness is the prime factor in news, whether it will be reported by the writer or the photographer. And just as there are news stories and feature stories, with an in-between hybrid called news-feature stories, so there are news and feature and news-feature photos.
--------------------------------------------------------------
The News Pictures
A news picture is one that illustrates news of the day or, in case of events at distant points, provides the first available illustration. There are three kinds of pictures:
--------------------------------------------------------------
The Feature Photos
A feature picture purport to show lighter and less urgent phases of the human drama. The news picture has the quality of immediacy; it demands to be published; if it is not published on receipt by one newspaper, a competitor will use it, which means its value is spoiled for the tardy one. The Feature picture has no such urgency.
--------------------------------------------------------------
The News-Feature Photos
This type of photograph is rich in human interest but with only a minor reliance for its importance upon the news to be classed as a news feature picture. It tells no important news, yet, if not use quite promptly, is of no value.
Sources of Pictures
There are various sources of pictures to be used by the editorial staff of the different newspapers. Each publication, irrespective of the size and staff of the newspaper, has its own photographers including a photo laboratory and its accessories. News agencies also provide news-photos to their respective clients. Such pictures may be positives (direct from wire-photo or telephoto receivers, prints made from negatives received at the national bureau and delivered to the clients), mats (usually mailed to the clients), negatives (for color pictures or facsimiles.) Engravings can be made from pictures transcribed from facsimile, thus eliminating the necessity of waiting for prints from negatives. Facsimile is especially geared to newspapers that do not have wire-photo or telephoto receivers.
Other important sources of news photos are the government offices, the ministry of public information, the public information sections and or offices of the various public and private institutions, business offices, banking institutions, the different media networks and advertising agencies.
Next post will have some sample pictures, watch out! :)
The topic we are going to discuss is the news pictures for the daily newspapers. Timeliness is the prime factor in news, whether it will be reported by the writer or the photographer. And just as there are news stories and feature stories, with an in-between hybrid called news-feature stories, so there are news and feature and news-feature photos.
--------------------------------------------------------------
The News Pictures
A news picture is one that illustrates news of the day or, in case of events at distant points, provides the first available illustration. There are three kinds of pictures:
- the picture that shows the news happening;
- the picture of the agency or site or result of the event; and
- the personality shot, preferably with a spot news picture.
--------------------------------------------------------------
The Feature Photos
A feature picture purport to show lighter and less urgent phases of the human drama. The news picture has the quality of immediacy; it demands to be published; if it is not published on receipt by one newspaper, a competitor will use it, which means its value is spoiled for the tardy one. The Feature picture has no such urgency.
--------------------------------------------------------------
The News-Feature Photos
This type of photograph is rich in human interest but with only a minor reliance for its importance upon the news to be classed as a news feature picture. It tells no important news, yet, if not use quite promptly, is of no value.
Sources of Pictures
There are various sources of pictures to be used by the editorial staff of the different newspapers. Each publication, irrespective of the size and staff of the newspaper, has its own photographers including a photo laboratory and its accessories. News agencies also provide news-photos to their respective clients. Such pictures may be positives (direct from wire-photo or telephoto receivers, prints made from negatives received at the national bureau and delivered to the clients), mats (usually mailed to the clients), negatives (for color pictures or facsimiles.) Engravings can be made from pictures transcribed from facsimile, thus eliminating the necessity of waiting for prints from negatives. Facsimile is especially geared to newspapers that do not have wire-photo or telephoto receivers.
Other important sources of news photos are the government offices, the ministry of public information, the public information sections and or offices of the various public and private institutions, business offices, banking institutions, the different media networks and advertising agencies.
Next post will have some sample pictures, watch out! :)
Friday, January 22, 2010
ONLINE GALLERY
We will be creating our online gallery where you will upload all your albums for the mid term and final exams. This will serve as your image depot where everyone can see and check out your masterpiece :)
I have created an account in shutterfly.com
email: bbr32d@gmail.com
pword: dekalidad
Explore the site and let me know any questions you might have.
Let's talk about this tomorrow.
I have created an account in shutterfly.com
email: bbr32d@gmail.com
pword: dekalidad
Explore the site and let me know any questions you might have.
Let's talk about this tomorrow.
Monday, January 18, 2010
the RED TAPE
 Even children could be affected by this disease called "red tape". This picture is the winner of the first Europe-Asia online-competition "Freedom of Young Media"
This came to a surprise.
Who would have thought that one of my Photojournalism students made the entire PUP community proud.
I was in a faculty meeting yesterday and one of the professors who attended the meeting was reading a newsletter pertaining to an award winning photo from a competition. I was really not paying too much attention then because we just wrapped up the meeting and everyone was getting ready to go home. But the familiar name that she blurted out that took the award winning photo grabbed my attention. It was from BBrC 3-2D. It was taken by Ocaña.
You just hit it big time, dude! You just made your parents proud. You just added another milestone to COC. You simply gave your classmates good reasons to be proud of you. You gave the COC faculty another chance to wear that big, happy smile.
Let this be an inspiration to everyone who really wants to pursue a career in photography. Or better yet, have this as your other venue in releasing stress and multiplying your creativity at the same time.
I know that everyone is as creative as everyone else in the class. It is just a matter of putting your heart with you are doing.
This is really your life through the lens.
Sir Edong :)


How to take Pictures
TOP TEN TIPS FOR TAKING PICTURES
GET DOWN ON THEIR LEVEL
- Hold your camera at the level of your subject's eye level to capture the power of those magnetic gazes and mesmerizing smiles.
- For kids and pets that means getting down on their level to take the picture
- They don't have to look directly into the camera, the eye level angle by itself will create a personal and inviting feeling
-
USE A PLAIN BACKGROUND
- Before taking a picture, check the area behind your subject
- Lookout for trees or poles sprouting from your subject's head
- A cluttered background will be distracting while a plain background will emphasize your subject
USE FLASH OUTDOORS
- Even outdoors, use the fill flash setting on the camera to improve your pictures
- Use it in bright sunlight to lighten dark shadows under the eyes and nose, especially when the sun is directly overhead or behind your subject
- Use it on cloudy days, to brighten up faces and make them stand out from the background
MOVE IN CLOSE
- To create impactful pictures, move in close and fill your picture with the subject
- Move a few steps closer or use the zoom until the subject fills the viewfinder. You will eliminate background distractions and show off the details in your subject
- For small objects, use the camera's macro or 'flower' mode to get sharp close-ups.
- TAKE SOME VERTICAL PICTURE
- Many subjects look better in a vertical picture-from the Eiffel tower to portraits of your friends
- Make a conscious effort to turn your camera sideways and take some vertical pictures.
LOCK THE FOCUS
- Lock the focus to create a sharp picture of off-center subjects
- - center the subject
- - press the shutter button half way down
- - Re-frame your picture (while still holding the shutter button
- - finish by pressing the shutter button all the way
MOVE IT FROM THE MIDDLE
- Bring your picture to life simply by placing your subject off-center
- Imagine a tic-tac-toe grid in your viewfinder. Now place your subject at one of the intersections of lines.
- Since most cameras focus on whatever's in the middle, remember to lock the focus on your subject before re-framing the shot.
KNOW YOUR FLASH'S RANGE
- Pictures taken beyond the maximum flash range will be too dark.
- For many cameras that's only ten feet about four steps away. Check your manual to be sure.
- If the subject is further than ten feet from the camera, the picture may be too dark.
WATCH THE LIGHT
- Great light makes great pictures. Study the effects of light in your pictures.
- For people pictures, choose the soft lighting of cloudy days. Avoid overhead sunlight that casts harsh shadows across faces.
- For scenic pictures, use the long shadows and color of early and late daylight
BE A PICTURE DIRECTOR
- Take an extra minute and become a picture director, not just a passive picture-taker.
- Add some props, rearrange your subjects, or try a different viewpoint.
- Bring your subjects together and let their personalities shine. Then watch your pictures dramatically improve.
A. FILM LOADING
14 Steps in Loading a Film
· Obtain a roll of 35-mm camera film suitable for the pictures that will be taken.
· Set the exposure mode dial to the flash shutter speed setting.
· Remove the protective case and place the camera on the firm surface with the lens facing down.
· Pull the camera back release pin until the back pops open a slight amount.
· Open the camera back. It is wise to place an object such as the camera case under the back so the hinges are not damaged.
· Place the film magazine (cassette) in the film chamber. Caution: It is best to load a film in subdued lighting. Be sure the protruding core is pointing in the correct direction. Push the camera back release pin and rewind knob down to engage the film magazine.
· Pull the film leader across the film guide rails until reaching the take-up spool. Thread the film leader (narrow portion) into the spool.
· Advance the film by alternately operating the wind lever and depressing the shutter release button. This only needs to be done once or twice until both the top and bottom sprockets engage the film perforations.
· Close the camera back. Make certain it latches by pressing it firmly so the release pin and the rewind knob hold the camera back will permit light leaks, thus exposing the film to unwanted light.
· Advance the film two complete frames. This pulls film from the magazine that has not been struck by light. The exposure counter should read “I” at this point. While advancing the film, watch the rewind knob. It should turn as film is unwound from the magazine, indicating that the film has been correctly loaded in the camera. If no movement is seen, advance the film one more frame. If there is still no movement in the rewind knob, open the camera and rethread the film onto the take-up spool.
· Reset the exposure mode dial to the desired setting.
· Set the film speed dial to match the ISO (ASA) speed to film. This is usually done by slightly lifting the dial ring and turning it until the correct number is aligned with a red or orange mark.
· Place the top of the film box into the memo holder or tape it on the back of the protective case. This provides a ready reference to the kind and speed of film in the camera.
· Replace the protective camera case. The camer4a is now ready to be used to take pictures.
B. SETTING FILM SPEED
It is important to select a film that is suitable for the pictures to be taken. Probably, the most important consideration is the speed of the film. All but a few continuous-tone photographic films are rated according to their sensitivity of light. The system is known by the initials ISO (International Standards Organization). Typical speed ratings are ISO 25, ISO 64, ISO 125, ISO 400, and ISO 1000. Another system is DIN (Deutsche Industry Norm) or German Industrial Standard if translated in English. Typical DIN ratings include 15 through 32. The ISO system was known before as ASA (American National Standards Institute).
· Speed ratings lower than ISO 100/21degree are considered to be slow films. Films of ISO 400/27degree and higher are listed as fast films. Medium speed films fall between these numerical values.
ENTERING FILM SPEED
· The camera must know the speed of the film to assess the exposure correctly. Film speed is measured numerically. It is often input on the scale on the shutter speed dial, which is adjusted by lifting the dial’s collar and rotating it until the appropriate speed appears in a small cutout. Some cameras keep one dial specifically for the film speed.
· The most recent method of inputting the film speed-DX coding- is by electrical contacts inside the camera which align with a painted pattern on the metal of the cassette. The contacts detect where there is metal, and determine both the film speed and the number of exposures in the cassette.
· Some cameras have a small window in their back through which the photographer can read the small print on the cassette detailing the film type, its speed and the number of exposures.
C. HOLDING THE CAMERA STILL
1. Techniques in holding your camera
One of the common problems that many new digital (and film) photographers have is ‘camera shake’ where images seem blurry – usually because the camera was not held still enough while the shutter was depressed. This is especially common in shots taken in low light situations where the shutter is open for longer periods of time. Even the smallest movement of the camera can cause it and the only real way to eliminate it is with a tripod.
Adding to camera shake is a technique that is increasingly common with digital camera users of holding the camera at arms length away from them as they take shots – often with one hand. While this might be a good way to frame your shot the further away from your body (a fairly stable thing) you hold the camera the more chance you have of swaying or shaking as you take your shot.
Tripods are the best way to stop camera shake because they have three sturdy legs that keep things very still – but if you don’t have one then another simple way to enhance the stability of the camera is to hold onto it with two hands.
While it can be tempting to shoot one handed a two hands will increase your stillness (like three legs on a tripod being better than one).
Exactly how you should grip your camera will depend upon what type of digital camera you are using and varies from person to person depending upon preference. There is no real right or wrong way to do it but here’s the technique that I generally use:
Use your right hand to grip the right hand end of the camera. Your forefinger should sit lightly above the shutter release, your other three fingers curling around the front of the camera. Your right thumb grips onto the back of the camera. Most cameras these days have some sort of grip and even impressions for where fingers should go so this should feel natural. Use a strong grip with your right hand but don’t grip it so tightly that you end up shaking the camera. (keep in mind our previous post on shutter technique – squeeze the shutter don’t jab at it).
The positioning of your left hand will depend upon your camera but in in general it should support the weight of the camera and will either sit underneath the camera or under/around a lens if you have a DSLR.
If you’re shooting using the view finder to line up your shot you’ll have the camera nice and close into your body which will add extra stability but if you’re using the LCD make sure you don’t hold your camera too far away from you. Tuck your elbows into your sides and lean the camera out a little from your face (around 30cm). Alternatively use the viewfinder if it’s not too small or difficult to see through (a problem on many point and shoots these days).
Add extra stability by leaning against a solid object like a wall or a tree or by sitting or kneeling down. If you have to stand and don’t have anything to lean on for extra support put your feet shoulder width apart to give yourself a steady stance. The stiller you can keep your body the stiller the camera will be.
Gripping a camera in this way will allow you flexibility of being able to line up shots quickly but will also help you to hold still for the crucial moment of your shutter being open.
Another quick bonus tip – before you take your shot take a gentle but deep breath, hold it, then take the shot and exhale. The other method people use is the exact opposite – exhale and before inhaling again take the shot. It’s amazing how much a body rises and falls simply by breathing – being conscious of it can give you an edge.
Of course each person will have their own little techniques that they are more comfortable with and ultimately you need to find what works best for you – but in the early days of familiarizing yourself with your new digital camera it’s worth considering your technique.
One last note – this post is about ‘holding a camera’ in a way that will help eliminate camera shake. It’s not rocket science – but it’s amazing how many people get it wrong and wonder why their images are blurry.
There are of course many other techniques for decreasing camera shake that should be used in conjunction with the way you hold it. Shutter speed, lenses with image stabilization and of course tripods can all help – we’ll cover these and more in future posts.
D. Making Exposure
1. Controlling the Source
A. APERTURE - is an opening which lets something pass through. A lens aperture allows light to pass through a lens carrying the image to the film within the camera
Numbers called f-stops are used to measure the size of the aperture openings. The larger the opening, the more light it will pass.
The aperture openings regulate how much light passes through a lens at any given time. The various aperture openings are identified by f-stop numbers that typically range from f/1.4 (largest) to f/22 (smallest).
An iris diaphgram diaphragm is used to regulate the aperture openings. It is a series of metal leaves that are accurately controlled by an intricate system of pins and linkages. It is located within a lens between the elements of ground and polished glass. Eight (8) metal leaves are used to make a typical iris diaphragm.
Iris Diaphragm
The numbers used to designate given apertures of f-stops are based on the diameter of the diaphragm opening and the focal length of a lens. For example:
Lens focal length = 50 mm
Maximum diaphragm opening = 35 mm
Divide the focal length by the maximum diaphragm opening to obtain the f-stop number. Only one (1) decimal place is used, otherwise it would become extremely confusing.
50 mm ÷ 35 mm = 1.429 thus f/1.4
As the diaphragm opening becomes smaller, the f/stop number becomes larger.
50 mm ÷ 0.25 mm = 8.0 thus f/8
"The selection of half-stops does make a difference in the amount of light each opening allows through a lens."
Half-stops are the aperture adjustments midway between the standard f-stops. These are useful when just a little more or less light is needed to make the correct exposure.
An Aperture ring is used to adjust the diaphragm for the various f-stops. The f-stops are clearly marked, generally in white, on the ring. This makes them easy to see the black color of the lens barrel. A diamond shaped line, usually red, is marked on the stationary area of the lens barrel next to the aperture ring. An f-stop is set by aligning the selected f –stop number and the red line.
Exact f-stops, whether full or half, are easy to adjust. The aperture ring contains "clicks" or slight notches that can be felt through the fingers when the ring is moved. The clicks alco can be heard with most lenses.
B. CAMERA SHUTTER – is similar to a door. It is closed, part open, fully open, part closed, and again closed. During this cycle, a specific amount of light is permitted to reach the film.
There are two (2) basic types of shutters used in cameras:
1 .Leaf shutters are located near or within the lens of a camera
2. Focal plane shutters are located as close to the film as possible but between the lens and the film.
The Leaf Shutter is made of three (3) or more very thin blades. The material used to make the blades is either spring steel, plastic, or titanium. A series of "clocklike" precision parts make it possible for the blades to open and close. Leaf shutters are used on nearly all viewfinder cameras because they cost less than focal-plane shutters. Some medium format cameras have leaf shutters built into the interchangeable lenses. Leaf shutters also are used in twin-lens reflex and view cameras.
The Focal – Plane Shutter are used in nearly all 35-mm, single lens reflex cameras. These shutters include two (2) rubberized fabric or metal curtains that are mounted as close to the film as possible. Focal-plane shutters are designed to operate either in a vertical or horizontal direction across the film frame.
Two curtains move or run across the film frame, one head of the other. When the shutter release is squeezed, the lead curtain travels in front of the film and is then followed shortly thereafter by the trailing curtain.
C. Shutter Speed and the Shutter Speed Choices
Shutter speed setting determines how fast the curtains move and how much space or opening is between the curtains. Shutter speeds are measured in fractions of a second. A 1-second shutter speed is very slow, whereas a 1/2000th of a second shutter speed is very fast. Shutter speeds are marked on the camera only with the denominator of the fraction. For example, a marking of 250 equals 1/250 of a second.
Shutter Speed Choices
Many 35-mm SLR cameras are now equipped with up to 14 choices of shutter speeds. This gives the photographer a wide of variety of choices. Shutter speed adjustments and reading are commonly located in two (2) different areas of 35-mm SLR cameras. Manual adjustable cameras have a shutter speed dial often located on the top and right side near the film advance.
Numerical values, LCDs and LEDs are used in the viewing to indicate the shutter speed selection.
Shutter speed and f-stop adjustments have a direct relationship. The several shutter speed and f-stop combinations permit the same amount of light to reach the film during exposure.
2. Taking Exposure Readings
Meters have a light-sensitive surface or "cell" to measure accurately the actual illumination reflected from the subject under all sorts of conditions. A separate hand-held meter has the advantage of serving all cameras and, unlike meters that are built into the camera, enables you to check exposure quickly without having to use your camera. This is particularly useful when you have the camera on tripod with a carefully set viewpoint, because you are free to take close-up readings without disturbing the camera position.
Exposure tables are useful guides for "average" subjects in specified lighting conditions.
Exposure meter is much more versatile and accurate because it reads your particular subject and lighting conditions. For a subject like the picture right, a general overall meter measurement will give good results. But sometimes the meter can give a misleading reading of the exposure.
Two Types of Exposure Meter
1. Hand-held meters have a light-sensitive cell, a needle and light-reading scale, and a calculator to convert the reading into f numbers and shutter speeds.
The meter shown below has a selenium cell, which generates its own electricity from light and so does not need a battery. Some hand (and all through-thelens) meters use a smaller, photo-resistant cell, which is more sensitive but needs a battery.
With selenium cell meters under poor lighting, the hinged baffle at the back of the meter should be down to allow the needle to read over one scale.
Under bright light, the baffle should be up, covering the light sensitive cell- the needle then reads over a different, higher scale. When using a hand-held meter be careful not to obstruct the light sensitive cell.
2. Through-the-lens meters measure light from the subject in various ways. Some view the whole picture area, averaging out the light and dark areas, top right. This is fine if your picture has roughly equal amounts of light and dark areas.
A few through the lens meters give "spot" readings, center right- they read small area of the picture, usually a central zone marked on the focusing screen. This enables you to read exposure for just one key area, such as a face, or to take more than one measurement-from the light and dark areas-which can then be avaraged to get an over all reading. A spot reading allows you greatest control and accuracy buut it is also easy to make a mistake, for example, measuring only the sky when your subject is mostly landscape.
Some meters use a "center-weighted" system, which measures most of the picture but gives prominence to the central area, bottom right. This works well provided the central area is representative of the whole scene.
Sources
Books
Dennis, Arvin; Applied Photography, 1985
Langford, Michael; The Step by Step Guide in Photography, 1980
E. Unloading film from a 35-mm camera
Just as with loading the 35-mm camera, it is very important to carefully unload the camera too. For example, the camera back should never be opened in the light with the film extended from the magazine. When the last exposure has been taken, the following procedure should be used.
1. Remove the case from the camera.
2. Raise the rewind crank in preparation for winding the film back into the magazine.
3. Depress and hold the film rewind button. Turn the rewind crank according to the arrow to return film to the magazine.
4. Continue rewinding until all of the film, including the leader, is inside the magazine.
5. As when loading the film, open the camera back in subdued lighting and remove
the film magazine.
6. Close the camera back, and position the camera so it does not fall from the work location.
7. Place the exposed film in a protective container. It is now ready for processing.
8. Reload the camera with a new roll of film.
II. VISUAL AWARENESS
Rule of Thirds
Perhaps the most important photography composition understands the rule of third.
Thisrule states that “image can be divided into nine equal parts by two equally-spaced horizontal lines and two equally-spaced vertical lines. The four points formed by the intersections of these lines can be used to align features in the photograph. Proponents of this technique claim that aligning a photograph with these points creates more tension, energy and interest in the photo than simply centering the feature would.”
With locating the interest on one of the intersections will create a balance and interesting look on viewer eyes. If we put the object(s) in the center, it is usually create a monotonous and static feels.
Putting the face in above left intersection create a balance, dynamic lookThe model is Kimberly Kane ‘08, Bucknell University
Example of Rule of Third applied in portrait orientationThe model is Jason Burrsma ‘08, Bucknell University
1. Detailed Seeing (EDFAT formula)
The acronym EDFAT was ingrained into Wingfield’s mind by his photojournalism professor Frank Hoy. Hoy brought Arizona State University ’s photojournalism department to prominence and is perhaps best known for winning The Hague Holland World Press Photo Award while working at the Washington Post. Hoy used to bark at his students to practice this simple but effective technique while on assignment.
EDFAT stands for: Entire, Details, Frame, Angles, and Time.
ENTIRE
Get 15 feet away and focus on the entire situation and person as part of the environment. Shoot horizontal and frame the person off center. In some instances, centering the photo works if there is an even play on the background. Always shoot two or three vertical frames and apply the standard rules of composition. Slowly move in to about 10 feet and start over.
DETAILS
Get about several feet from your subject and search for details of the person. Concentrate on the upper half of the person and watch your background. Get to know the person’s personality and use their own energy to your advantage. Use eyes, hands, facial features, hair, and other elements to bring out your subjects. In some cases, you can even let the subject come to you, case in point.
ANGLES
There's always more than one way to angle a photograph. Try and ask yourself: “What would the person, or situation look like if I was to change angles?” Try shooting straight on, from below, overhead, from behind and from any other angle you can find.
FRAME
When framing a photograph it crucial to be conscious of the in-camera cropping. When shooting a close up fill the frame with the subject’s face. Move in as close to the shortest focal distance your lens will focus as possible and study the details on the subject's face. Enviromental portraits require the person’s habitat, so shoot horizontal and include their work space, home, garden, etc.
TIME
When pressing the shutter button, you are capturing a moment. “During this shooting exercise, you should have been using the fifth element of EDFAT ¬ time ¬ in two ways: first as a series of shutter speeds to capture the action and second, as a span of time that allows you to explore in full details many visual possibilities of a single subject.”
EDFAT can be applied to all your photographic endeavors. It is a formula that will make one think about their subjects in new ways and increase the chances of producing a one-of-a-kind image.
2. Composing Photographs
Introduction
It is important to remember that photographs are made not simply just taken. The photographer are made and not just simply taken. The photographer must use the viewfinder of a camera to locate best scene possible to record on film. To compose a photograph is one of the most important stages in the process of creating a photograph. Technical knowledge and ability plus elaborate equipment are of limited value unless the finished photograph is useful or is pleasant to look at.
Defining composition
Composition
- A pleasing selection and arrangement of the elements within the picture.
- Its purpose is to organize the different components of a photograph in such a way that the picture becomes a self-contained unit.
In composing photographs it is necessary to direct and concentrate interest where it belongs, to arrange lines and forms in harmonious patterns, to balance distribution of light and dark in “graphic” equilibrium, and to create organic boundaries-a unobtrusive natural frame which holds the picture together. To do this, the photographer has four choices:
1. To arrange or direct the subject
2. To change his viewpoint
3. To wait for the right moment
4. To improve composition during enlarging
Aspects to consider when “composing” photographs:
1. Simplicity
a. The more simply conceived and executed, the stronger the picture will be.
b. Each picture should contain only a single subject. Multiple subjects produce multiple centers of interest and, therefore, divide the attention of the observer.
2. “Graphic“black and white (often more effective than a long scale of subtle shades of gray.
a. Do not be afraid of using it in your pictures – no matter what you have been told concerning “empty” highlights and shadows.
b. A highlight that is not pure white appears “fogged” and dirty, while a black, detail less shadow can often hold a whole composition together, giving it power and strength.
3. The background
a. One of the most important- and mostly frequently neglected-parts of the picture.
b. A cluttered background ruins any photograph.
c. The best of all backgrounds is the sky.
4. The horizon (if present)
a. Low horizon – suggests distance, space, and a sense of elevation.
b. High horizon – emphasizes the foreground and the earth, suggesting more materialistic qualities.
c. You may place the horizon anywhere in the picture – even directly across its center.
5. Framing
a. Framing the subject with interestingly silhouetted, dark foreground matter leads the eye toward the center of the picture and tends to increase the impression of “depth”.
6. A close-up
a. Always creates a stronger impression than a view from farther away.
b. It produces a feeling of intimacy, brings out surface texture and presents the very essence of the subject.
c. Cropping is one of the surest ways to increase the impact of a picture.
7. Light and shade
a. “Modulating” light and shade create illusions of three-dimensionality, roundness and depth.
b. “Graphic” light and shade – white and black – set the key of a picture and determine its ‘graphic’ pattern.
c. Light tones and white are aggressive. They suggest joy, youth, ease, and pleasant sensations.
d. Dark shades and black are passive. They suggest somber moods, power. Strength, age, and death.
e. Light areas in the picture attract the attention of the observer first. Dark parts allow the eye to rest and provide a picture with strength.
8. Motion
a. This can be best symbolized by blur – the more blurred the image, the more convincing the illusion of speed.
b. It can be suggested by means of a diagonal composition. This applies particularly if the moving subject must for reasons of clarity be rendered sharply.
9. The proportions of the print
a. The number of possible proportions of the print is infinite – from extremely narrow horizontal, through square, to extremely narrow vertical. Effective use of these possibilities is an important step in composing.
10. Cropping during enlarging
a. Main forms of the picture should not touch the margins of the print. Either place them well inside its boundaries or cut them partly off.
b. Symmetry is usually boring – try to avoid it, unless there is a specific reason for it.
c. Lines that directly run into a corner seem to split it. Trim the picture so that this does not occur.
d. Small white forms along the edges of a print make the picture look as if mice had gnawed its margins. Trim them off. If this is not possible, darken such areas by “burning in” while enlarging.
Eight Photographic Composition Guidelines
The quality or cost of the camera and accessories has no bearing on whether these guidelines improve the composition of the finished photograph.
· SEE A PHOTOGRAPH BEFORE IT IS TAKEN.
o Photographs are waiting to be made of the scenes that can be seen by the photographic eye. A photographer should be able to make useful photographs of nearly any visual image seen by the human eye.
o Photographs are commonly used for the following;
· Used for information
o Science
o Technology
o Law enforcement
o Accident scenes
o Pathology
o Etc.
· Used to record information
o The photographer must be able to see what information should be recorded on film. This requires sensitive eyes of a skilled photographer.
o Pictures can be well planned in advance, or they can be unexpected and available in an instant. A photographer who can judge a scene quickly is a person capable of securing many useful and beautiful photographs. Keeping a photograph SIMPLE is one of the best “seeing’ guidelines that any photographer can remember. Too much content in the recorded scene makes it difficult for the viewer to see the central theme of the photograph.
o Photographs can be made to tell a story.
· COMPOSE IN THE VIEWFINDER.
o Viewfinder (camera)
- Useful for more than just aiming the camera in the correct direction.
- It can and should be used to carefully compose or arrange the scene content prior to release of the shutter
o Film is wasted when the photographer fails to take even a few extra seconds of time to study the scene in the viewfinder.
o A helpful technique in composing photograph is to form a ‘hand’ rectangle. It can be held up to an eye and serve as a frame for selecting the best composition. This type of viewfinder gives considerable flexibility and saves time in selecting the best scene to capture on film.
o Use the hands
o With the middle fingers,
o And thumbs
o Filling the viewfinder fame with the selected content is critical for clarity in the finished photograph.
o A common practice is to leave considerable space on all four sides of one or more people posing for a family picture.
§ This makes the faces appear so small, making it difficult to distinguish significant detail.
o A much better practice is to move closer and fill the viewfinder frame.
§ With this, detail is much clearer and viewers of the photograph know precisely who is being shown.
· CREATE A CENTER OF INTEREST.
o Find something in the scene to focus the viewer’s eyes upon.
o The photographer has the opportunity to select a portion of any picture and make it stand out. (The angle the camera is held in relation to the main subject helps to determine how the subject will be viewed.)
o A photograph with too many centers of interest is one with little or no interest at all.
· USE FRAMING TECHNIQUES.
o Frames
o The wood, metal, or plastic frames draw attention to their contents.
o Some frames are best suited for selected artistic works than any other frames.
o Creative talent is useful for good display of artistic work.
o In-picture frames.
o Architecture, landscapes, and seascapes can be highlighted when trees or manmade objects are used.
o You may also use Natural framing. (But you have to take time looking at it.)
o If the framings above are not available, you may create some type of frame.
o The goal posts on a football field can serve as excellent framing for educational activities: football team, band members, cheer-leading squad, and school friends.
· DIVIDE SCENE INTO THIRDS.
o To help position the main subject with the photograph, it is useful to divide the rectangular area into thirds.
o Divide the horizontal distance into three equal spaces with two vertical lines.
o Also divide the vertical distance into three equal spaces with two horizontal lines.
o The rectangular area thirds with will give four points of intersecting lines.
o It serves as guides to position the center of interest in the photograph
o Any one of the four positioning points gives equal results.
· Consider the picture content while selecting the position point.
o The actual lines are not needed, because once this concept is known, it is easy to judge the location of the position points. The photographer should have little trouble identifying these four points when looking through the camera viewfinder.
· OBSERVE BACKGROUND CLOSELY.
o Sometimes, the photographer fails to carefully check the background directly behind the subject.
o Look closely in the viewfinder for vertical objects that may cause abnormal backgrounds for the main content of any picture.
o Horizontal type backgrounds often provide strange looking results too.
o The photographer can move to a different location and take advantage of what is behind the center of interest..
o The subject can be moved forward, backward, or to either side, giving greater emphasis to the subject and less on the background.
o Another problem centers on the edges of a photograph.
o Careful aiming of the camera eliminates problems of “cutting-off” a portion of the center of interest.
o Taking a few extra seconds to study the scene in the viewfinder can eliminate positioning problems near the picture edges.
o Intrusions in the picture area draw the viewer’s eyes away from the main subject content.
· SEEK VISUAL PERSPECTIVE.
o Perspective is important to consider in many aspects of picture taking.
o The perspective appears near normal when the camera is more equidistant from both the bottom and top of the structure. (To maintain good perspective, the photographer should get down to the same level as a small child.)
o Converging lines (such as seen when looking down railroad tracks) give the viewer a sense of depth and distance.
o The vertical lines or edges of a tall building appear to converge when the photographer stands too close and tilts the camera up to get the whole building in the picture.
· BE SENSIIVE TO MOTION.
o Moving objects can be photographed with precision.
o There are two methods;
· Stop-action
o Fast shutter speeds of 1/250 and above should be used when there is sufficient light and with fast films of ISO 200 and above.
o The results using a fast shutter speed (to stop the action of a moving object) and a small aperture show all content of the photograph to be in focus.
o Camera-to-subject distance and angle to each other make a significant difference in choosing shutter speeds.
o There are many variables that must be considered whenever people or objects are moving within the picture area. Experimentation and bracketing are necessary for consistent and usable results.
· Panning
o Moving the camera with the moving object gives interesting results.
o Two important techniques:
§ Refocus the lens on the spot where the picture will be taken.
§ Keeps the camera moving with the object before, during, and after squeezing the shutter release?
o Slower shutter speeds can be used with the panning method than with the stop-action method.
o Panning helps to focus the attention of the viewer on the center of interest, which improves the composition of the photograph.
3. DIFFERENT LIGHTING CONDITIONS
A. AVAILABLE LIGHT
An enormous number of pictures can be taken by using sunlight. Pictures are everywhere, both outdoors and indoors. Also, pictures are present during all types of weather conditions—rain, mist, haze, fog, and snow.
* Another important point to remember when taking pictures in sunlight involves measuring the available light. Light meters are fooled under certain conditions; thus, the photographer needs to compensate and override the aperture/shutter reading so that useful and creative photographs will result.
INDOOR
Sometimes called existing light and low light, refers to the normal lighting found inside a building. Sunlight streaming into an indoor environment gives a photographer many opportunities to be creative. Light coming through windows casts both harsh and soft shadows; thus, it is important to look for the best angle. The time of day makes a significant difference in the amount and angle of the light. The best lighting conditions from window sunlight can be determined by observing the light falling on the subject during an entire day. Assuming the sunlight is approximately the same the following day, take pictures at the best identified times.
Skylight used in the roofs of commercial and residential buildings provide excellent diffused lighting. Skylights made of “milky” looking plastic or glass are much better than those made of clear plastic or glass. They give excellent diffused lighting to indoor space just as an overcast day gives even lighting outdoors.
Some unique pictures can be taken from the center of a room. Look through windows at the views found outdoors. Windows serve as frames and help to create panoramic views. Select the best indoor location and establish the aperture/shutter settings. Take a light meter reading from the camera location through the window. Also, take readings of the outdoor setting at the window location and again take a reading of a wall inside the room. Make certain the camera light meter does not get fooled by the direct window light. Compare the three exposure settings. If there are great differences, it will be necessary to determine a compromise exposure. It is also wise to bracket several shots and then select the best photograph after processing.
Low Lighting
If you tend to take many pictures indoors or after dark using available light you should use lenses that have a wide maximum aperture. A lens with a maximum aperture of f2 will allow you to yake hand-held pictures in half the light possible with an f2.8 lens.
In dim lighting a light meter sensitive enough to give reliable reading is essential. Selenium cell meters are comparatively insensitive in poor light. Battery powered hand and built-in meters with Cds, silicon or similar cells are much more responsive. If lighting conditions are very low, you can use a white card reading to get a response from the meter. Alternatively, set the ASA dial to twice or four times the correct rating for the film to get a meter reading. Then multiply the reading by this amount.
Long exposure times create problems of camera shake and reciprocity failure. To avoid these, you can use supplementary lighting.
Contrasty Lighting
Low light level subjects such as room interiors, bars, or street scenes at night are usually contrasty as well as dim. The lighting is much more uneven than daylight. As a result, contrast is more a problem than dimness. The more exposure you give to bring out shadow detail, the more “burned out” the lightest areas become. ”Uprating” the film, by underexposing and overdeveloping, which has advantages for dim lighting, increases the contrast still further. It is better to choose a viewpoint from which the subject is as softly and evenly lit as possible, rather than just brightly lit. to do this, make use of any supplementary lighting from signs, reflective surfaces, or open doorways. The flatter the lighting the more you can overdevelop fast film – up to 3000 ASA or beyond – and still avoid producing unacceptably hard negatives.
If you are using flash lighting you can reduce contrast by firing the flash several times during a long exposure.
Contrast and Distance
When photographing someone indoors it is tempting to place them near the window. This does increase the light but often gives very harsh contrast. By moving the subject away from the window and toward the opposite wall the contrast is reduced. Light from the window is weaker and reflected light from surroundings such as the rear wall is increased. The exposure must be increased to compensate for the reduced light.
Low Intensity, Soft Lighting
Subjects with low, soft lighting are not difficult to expose for if you have an accurate meter. The exposure reading suggested was 1/30 sec at f2 on fast, 1200 ASA film. But to avoid camera shake it was exposed at 1/60 sec, and the film given longer development. Because the lighting was soft the overdeveloped negative still printed well on normal grade paper.
Low Intensity, Harsh Lighting
Low intensity, harsh light created by a dark-toned interior, and brilliant daylight outside a window presents a difficult exposure problem. It was solved by losing the detail through the window. The exposure was measured by averaging only the light and dark areas within the room. The 400 ASA film was overexposed by one stop, then give reduced development to decrease the contrast.
Weak, Uneven Illumination
Under weak, uneven light you will often have to use a very long exposure. One way of reducing the contrast is to spread the illumination. Indoors you can do this by using light-toned reflectors positioned around the subject. Or, if you are working under normal room lighting, you can swing the light, during exposure, to spread the illumination. If the lamp is included in the picture its path will record as white trails. Outdoors at night you can use street lamps or the light cast by passing automobiles to illuminate a scene. The long exposure will record moving lights as bright lines, which can form interesting patterns in them.
Candlelight
A solitary candle gives very hard, contrasty lighting. But in a picture the random grouping of candles will create a softer, almost floodlit effect. The high contrast was reduced by the reflective while table cloth and slight flame movement during the 4 second exposure. The light reading was measured from the faces to record them correctly. Notice how the figures were arranged so that they could hold their positions comfortably during the exposure.
The aperture suggested by the meter reading ease increased and the development time of the film reduced to avoid reciprocity failure with the long exposure.
Reciprocity Failure
If you give extremely brief or long exposures most films behave as if they have a slower speed rating and give altered contrast. This is called reciprocity failure. It means that you must give extra exposure when working at speeds of faster than 1/1000 sec or longer than ½ sec. The easiest way to do this is by opening the aperture, as a longer exposure will simply increase the reciprocity failure.
In practice you will hardly notice any effect on black and white film with exposure times of up to 2-3 seconds. Color films show a noticeable color change at slow speeds.
The table below show by how much you should open the aperture for reciprocity failure with normal black and white film. The development time should also be adjusted as shown, to reduce the contrast. Long exposures increase contrast and require a shorter development.
Indicated exposure (secs) 1/10 1 10 100
Aperture increase 0 1 stop 2 stops 3 stops
Reduction in development 0 10% 20% 30%
The use of light in a photograph can be the deciding factor of whether that picture will be spectacular or terrible. When you use your camera to automatically chose aperture and shutter speed, what your camera is actually doing is using the built in light meter and measuring how much light is being reflected to the camera.
But that doesn’t mean that’s all there is to it. You should also think about the angle of the light entering the frame, what kind of shadows you want, and whether you want to use fill-in-flash (using flash to light the subject if you have a really bright background). If you are shooting at night you can create all sorts of cool effects like lights in motion, pictures with moonlight, or silhouettes like the one shown here. The following are just some examples of all the possibilities.
The angle of light should be taken into careful consideration whenever you feel like you want to create a specific effect. Shadows can be very powerful when cast over half of someone’s face. In this photo on the left the light is striking the statue’s face from the rear right of the camera and this adds more depth to the picture. It also adds more coloring because if front-lighting was used his face would likely be over exposed, and if back-lighting was used his face would just be black like a silhouette.
The effect of rays of light indoors and outdoors. can be very spectacular. A brilliant part of some great photographs is the ability to see actual rays of light. Whether it be in the setting of a brilliant sunset, light pouring through a window or from artificial lights it can look very impressive. Usually the only way to obtain something like this is a narrow aperture (high f/stop) and a very slow shutter speed.
Silhouettes are another interesting example of using light. The way to create a silhouette is to have significantly brighter light coming from behind the subject. In doing this it is important to take your camera light reading off of the background instead of the subject in order for the camera to adjust for an exposure based on the backlight. If you do this the subject will be successfully underexposed like in the picture at the top of this page.
If you keep experimenting with different ways of using light you will find that you can get very interesting results. The longer the exposure, the more fascinating the results with light most of the time. In the picture on the right, this is a long single exposure and yes that is the same person in two places. If your wondering how this was possible, here’s how.
The shutter speed was set for around 30 seconds, the camera was set on a tripod and someone stood next to the camera with a flashlight. The subject then stood in one place while the flashlight was pointed at him and moved in an up and down motion. After around 15 seconds the flashlight was turned off and the subject was told to move to his left. Then the flashlight was pointed at him again and moved up and down until the camera finished the exposure.
Available Light in the 21st Century
By Richard Martin, NYI Contributing Editor
First, let's take a little trip back in time. When I began in the 1950's, photography was still largely a black & white medium, especially in the realm of photojournalism. Magazines were beginning to use color but the slow film speeds generally precluded its use for news stories. A few newspapers experimented with color, usually on the front or back page of the first section, but that was it. As for available light images, this was the heyday of the big picture magazines, like Life, and photos that had a natural look and were lit by the existing illumination (rather than with flash) were the norm. 35mm cameras (rangefinder models, not SLRs) loaded with fast film like Tri-X and equipped with fast lenses made all this possible. Newspapers, on the other hand, were still stuck with the old flash-in-the-face style of imaging. Part of the reason was the limitation of newspaper reproduction but resistance to something new was also a factor. I remember the negative (no pun intended!) reaction the first time I used a 35mm camera on a newspaper assignment.
The black & white photos on this page were shot with Kodak Tri-X in the 1950's. Film speed, officially 400, was somewhere between 400 and 1000 (I didn't use a meter in those days. None of us did.) Development was by "inspection" under a dark green safelight. That meant opening the tank about halfway through the development, looking at the film VERY BRIEFLY, and then closing the tank.
Jump ahead to the present day. Color is now the norm both in magazines and newspapers. Black & white has not disappeared, in spite of predictions of its demise when color became practical, but magazines are virtually all color nowadays. Newspapers still use black & white, mostly on the inside pages, but color is more and more in evidence. Economics does play a role, though. Small publications like weekly newspapers often cannot afford the cost of color.
But what about available light color? Is it now feasible? Yes indeed! We now have fast color films but the real news for available light can be expressed with one word: digital. Well, actually two words: digital and RAW. But first let's examine available light work with present-day film, especially color negative. Why color negative? Because you have more flexibility in correcting color balance and exposure (at least, overexposure) than you do with reversal (slide) film. Color negative has more exposure latitude. True, you can scan slides into the computer and adjust these things with Photoshop but there are definite limitations. Slide film does not render high-contrast subjects very well or tolerate overexposure. Yes, you can select those areas in Photoshop and make them darker but the detail in blown highlights is gone forever. The usual approach is to expose around the highlights and let the shadows fall where they may. As for color corrections, that too can be done in Photoshop (especially if it's a "high-bit" scan) but only if a digital file is what you want as the final product. Of course, you could have that digital file made into a slide (some labs offer this service) but the result will never approach the quality of the original slide.
For these reasons, available light presents particular challenges when shooting slide film. So why would you choose that type of film for this? Well, if you are submitting film images as opposed to digital, magazines usually prefer slides (or larger transparencies) for reproduction reasons and most won't accept color prints. Don't even think about sending them a negative! With slides you have an original that's a positive image. You can see right away what you have captured. What this means, in a nutshell, is you must get it right in the camera. And that means truly understanding the medium and its limitations and that takes time and experience. Slide film is very unforgiving. On the plus side, however, film in general (even slide film) still handles low-light subjects better than most digital cameras and low light is what available light is all about. But that situation is changing and a major reason is RAW.
I discussed RAW in the context of point-and-shoot cameras in a previous article and the points I made are quite relevant when it comes to available light. Shooting under the latter typically requires a high ISO setting, (the color images here were shot at 400 ISO) in order to compensate for the low illumination and the small apertures of most zoom lenses. That means noise and that noise will be most noticeable in dark areas of the image. RAW gives you more control over noise reduction.
Color balance (white balance) is another issue that can best be handled by shooting RAW because you have more adjustment options, especially with Photoshop CS2. Color casts (incorrect color) are a common problem with available light and are sometimes even more difficult to fix due to light coming from various sources, each with a different color temperature. We can't select particular parts of the image in the RAW converter to adjust so in this latter case, the tools in Photoshop proper come into play. But shooting RAW means we have a high-bit file to play with and this gives us more control over the color.
Exposure is another area where RAW excels. In the main or Adjust tab for the Photoshop CS2 RAW converter, you have separate sliders to correct the highlights, shadows, and midtones. That does not mean you can just ignore exposure when you shoot. Gross underexposure will still result in a horrible image with lots of noise while with gross overexposure you can say bye-bye to detail. It does mean you can "tweak" the exposure and correct your initial capture. Plus you keep the original capture in case you change your mind and decide to do it differently later.
High contrast is often a big problem with available light and this presents special challenges for either slide film or digital capture. Typically, corrections require more than one tool. In Photoshop, opening an Adjustment Layer in Curves is the classic approach but you can also reduce contrast in the RAW converter by adjusting the Exposure, Shadows, Brightness, and Contrast sliders. But there's another way you might reduce contrast and it has nothing to do with Photoshop or any image editor. If your digital camera does not offer RAW capture but it does give you the option of adjusting the contrast parameters, just set some negative value. I routinely have contrast set for -2 in both of my digital cameras for those situations when I shoot JPEGs. By the way, Photoshop CS2 has a great new Shadow/Highlight tool. Click on the Show More Options box and you can then really fine-tune those adjustments.
But suppose you would rather stick with more traditional materials such as black & white film and the "wet" darkroom. That's fine because film is still around and so is the processing chemistry. However, let's take this a step further and assume you want to mimic the available light "look" of an earlier era. Perhaps you've been inspired by work by W. Eugene Smith, Henri Cartier-Bresson, and others. Well, the "look" was considered natural and realistic, partly because flash was not used and partly because the images were sort of captured on the fly. In other words, it was candid photography – unposed and often without the subject being aware they were being photographed. The expression "the decisive moment", made popular by Cartier-Bresson, was the goal of photographers everywhere and it's just as relevant today as it was in his time. Some people take this "mimicry" a step further, though, and try to add graininess to the photo. Grain, in some quarters, has become an artistic statement. I've always found this particular conceit to be rather amusing. Why? Because we "old-timers" did everything we could to REDUCE grain, not accentuate it. Graininess was a defect, like dust marks on the print, and editors hated it. Our films were grainy because that was the state of the technology at the time, not because we wanted them to be grainy. Fine-grain, "compensating" developers like Microphen, Microdol-X, and my all-time favorite, Promicrol, did the trick in reducing grain in those days and many of us had our own little secrets involving various mixtures and dilutions. Grain didn't disappear but it became less obvious.
Shooting under available light is certainly challenging but don't let that deter you. When all the elements (you the photographer, your camera, and the processing) fall into place, the rewards are great. The bottom line is simply this – choose the tools you are most comfortable with. It doesn't matter whether it's film or digital. What counts is the resulting image.
B. ARTIFICIAL LIGHT
The types of artificial lighting you use in photography give you complete control over the direction, quality, and strength of the light. You can move these light sources around, diffuse them, or reflect them. You can alter their intensity to suit the situation. There are two types of artificial light sources: spotlights and floodlights. Spotlights provide a concentrated beam of light. Floodlights give diffused, softer, more even, spread out light. You can add to these two basic types of artificial light sources. By using lighting accessories, such as reflectors, barn doors, diffusers, and snoots, you can control the light to provide a variety of lighting effects. Unless special effects are wanted, artificial light sources that are different in color temperature or quality should not be mixed (used together). When you are viewing a scene, your eyes adapt so color differences between two or several light sources are minimized. Color film, however, cannot adapt and shows the color difference in parts of the scene illuminated by different
FIVE MAIN EFFECTS OF CONTROLLING LIGHTS:
1. Diffusion- a diffusing material such as tracking paper, ground glass, or opal plastic, scatters light passing through it. This changes its quality from hard to soft.
2. Specular reflection- when you reflect direct light off a glossy-light tone surface, it remains harsh and directional. The plot reflections records as a glare spot.
3. Diffuse reflection- reflective, irregular surfaces, such as blotting paper on other textured materials, scatter light. This alters the quality of light, changing it from hard to soft.
4. Selective absorption- smooth gray or colored surfaces absorb some light and reflect the remainder. Colored surfaces reflect selected wavelengths; gray surfaces a percentage of all wavelengths.
5. Absorption- a black surface absorbs most of the incident light falling on it. The light energy is usually turned into heat, so dark-tone subjects or equipment will heat up easily.
LIGHTING EQUIPMENTS:
There are two main kinds of photographic tungsten lighting: spotlights and photofloods.
SPOTLIGHTS- are small clear lamps which gave you a concentrated beam of light. You can soften the light by diffuse reflection from a mat white surface called white lined umbrella or a white wall. You can also pass it through a diffuser, made of gauze or tracing paper. Barn doors and snoots attach to spotlights to restrict the beam width.
PHOTOFLOOD- has a diffused lamp and a large mat reflector, and gives you softer, even lighting.
USING ONE LIGHT SOURCE
LIGHTING POSITIONS:
1. Front lighting- reveals detail, but also flattens subject form and texture.
2. Hide side lighting at 45 degree- side lighting gives a much bolder, three dimensional effects. However, deep shadow suppresses detail in the parts of the face furthest from the lamp.
3. Top lighting- with the lamp placed above the bust, all its top-facing surfaces are highlight. The eyes and neck are in deep shadow, but the forehead, nose and cheek bone are emphasized.
4. Low side-lighting at 45 degree- gives a footlight effect since the head is facing the lamp, both side of the face are lit. But an ugly shadow is cast by the nose.
5. Back lighting- the lamp is just above the bust facing the camera. Mat white paper beside the camera scattered some illumination on to the bust to give an even, low illumination.
HARD AND SOFT LIGHTING:
Both pictures, right, were side-lit by the same single source, from the same height and position. For the near right picture a spotlight was used direct. This produced harsh with dense, sharp-edge shadows. For the far right picture a large sheet of tracking paper was placed across the light beam, closed to the subject. This diffused the light, producing soft quality side lighting that reveals form and detail in the subject.
USING TWO LIGHT SOURCE
There are times when one lamp is not enough, and you must add another light from a different direction. This may be to reveal detail in shadows areas, light one part of the picture separately or simply to illuminate a larger area. The most important rule in lighting is to decide exactly what job you want each lamp to do. Never add lamps indiscriminately just to increase the light. Always treat one lamp as your main source, begin by selecting its best position.
Filling-in shadows- often your main lamp will reveal form and shape in the subject but create dark, empty shadows. You can fill these by placing a second lamp opposite the first. If the two lamps are the same distance from the subject they will “cancel out” and give natural shadows. To avoid this “bounce” (reflect) the second light off white card or diffused it. This dims and softens the light so that only one set of strong shadows are formed by the main lamp. You can fill shadows even when working with a single lamp, by reflecting some of the light back on to the subject.
Lighting the background- you can tones in the subject and the background independently of each other by using a second lamp to the light background. A gray card background placed a reasonable distance behind the subject, it will appear almost white. But if the subject is lit more strongly, and exposure adjusted accordingly, the background will then appear quite dark.
Controlling background lighting- using two lamps on a subject enables you to control the lighting of your subject very accurately. For the still-life, left two lamps and a roll of seamless paper for the background were used. The lamp on the left provided at he main illumination. The one on the right lit background independently, so that it was possible to control the background tone relative to the subject. In this way you can arranged that the lightest part of the subject appear against the darkest part of the background and vice versa.
Using one lamp and a reflector- the dark shadows could reduce by using a second, weaker light source to fill-in.
Eliminating shadows- the still-life above was lit by a diffused camera. There are no hard shadows but light tones tend to merge with the bright background.
Varying light distance- when you are photographing strong three-dimensional shapes using a second light source at varying distance gives complete of tonal values.
Using two lamps bounced- you should illuminate the ceiling above the camera more than the area directly above your subject.
C. USING FLASH
A flash unit is basically a portable, hard light source. It briefly lights a wide area, but the illumination it gives falls off rapidly with distance.
The flash is usually briefer than the time your shutter is open, so it, not the shutter speed, determines the actual exposure time. The shutter must however be fully open at the moment the flash fires. This means you must synchronize the flash with the shutter, and with focal plane shutters, use speeds of 1/60 sec or longer, so that the complete frame is exposed.
You cannot measure the light given by a flash with a regular meter, the exposure is calculated indirectly. Guide numbers, or “factors”, supplied with the unit give you the combinations of aperture and subject distance for the correct exposure.
You can use flash on almost any subject. You can vary its position- it need not be on the top of the camera – and use it bounced or diffused as well as directly on the subject. It also has some special advantages. You can use it to fill-in harsh shadows or simulate sunlight. With electronic flash you can “freeze” fast movement, or even give a series of flashes during a long exposure, to create unusual effects.
APERTURE AND DISTANCE
Flash units carry guide numbers, or factors from which you calculate the correct exposure. Exposure is correct if your chosen f number multiplied by your flash-to-subject distance results in the guide number for your film speed. For example, if the guide number is 110, you can use f11 at 10 ft, f22 at 5 ft, and so on. This relationship between aperture and distance depends on the inverse square law.
SYNCHRONIZATION OF FLASH AND SHUTTER
In the diagram below, the center disk shows when the shutter is open; the outer ring the flash period; and “C” when the shutter triggers the flash. A flashbulb is correctly triggered by the “M” socket, top left, allowing the bulb to burn to full power. Electronic flash fires correctly with the “X” socket, bottom left. Electronic flash fired on “M” top right, or a flashbulb on “X”, bottom right, fails to synchronize with the shutter.
POSITIONING THE FLASH
The picture, right. Was taken with a flash fired from on the top of the camera. It has created harsh, unnatural lighting. The picture, below, shows the same subject, again taken with flash. The more natural lighting was achieved by pointing the flash upward to bounce it off the ceiling. Some flash heads hinge for this purpose; others have a “bounce board” included in the unit. When using the flash indirectly you must compensate by increasing the exposure by two stops.
TYPES OF FLASH
BULB FLASH
Flash bulbs burn brilliantly for around 1/50 sec. The illumination rises to a peak and then fades. You use a battery to fire most bulbs but some require only the weak current generated within the shutter. The flashbulbs unit fits into the “hot shoe” on the top of the camera or it can be plugged into the “M” socket on the camera, using the synchronizing lead. Flashbulbs are available in cubes, flip-flash bars or individual bulbs. Bulbs can be fitted into reflector units.
ELECTRONIC FLASH
Electronic units use batteries, and can be used in the “hot shoe” or plugged into the “X” socket using the synchronizing lead. The flash is immediate, constant, and very brief. Units range from miniature types to large professional kinds. The intermediate unit has a head which can be tilted to “bounce” the light. Some units read the illumination during the flash, and cut it off as soon as enough light has been given for the aperture in use.
FILL-IN FLASH
Flash is a useful fill-in light source when existing lighting conditions are very contrast. This happens, for example, when you are taking a subject indoors against a bright window. Used carefully, fill-in flash enables you to expose for the detail through the window without underexposing and losing detail in the subject and interior. You can use flash in either daylight or tungsten light for black and white photography. But for color film, avoid mixing flash with tungsten light because the flash light is color balanced for daylight.
Fill-in flash is best used on the camera itself but it is usually necessary to bounce or diffuse the illumination given by the flash to prevent double shadows from forming in the subject.
To calculate the exposure for fill-in flash, double the flash factor, divide it by the subject distance, and then set the resulting f number on your camera. Now use your exposure meter to measure the brightest existing highlight area, and use the shutter speed that is shown against your calculated lens aperture. Doubling the flash facto underexposes the light given by the flash by two stops. As a result the flash does not record as brightly as the existing lighting- filling-in the shadows without upsetting the balance of the natural lighting.
LIGHTING A DARK INTERIOR
When you are photographing a dark, contrast interior, you must use artificial lighting to avoid underexposing the scene. By firing the flash from several different positions during a long exposure you can light the whole subject without destroying the impression of natural lighting.
SIX WAYS TO USE FLASH
1. Direct flash on camera
For the majority of photographers, especially when they want to catch a fleeting moment, this is the quickest and simplest method, but the light is often flat and uninteresting, producing few of the shadows or textures that add roundness and sparkle.
2. Diffused flash on camera
For a softer effect, the harshness and intensity of the flash can be reduced by placing a spun-glass filter in front of the unit, or by simply draping a handkerchief over it. This is a particularly useful way of preventing glary white features in closeups.
3. Reflector less flash on camera
In some flash units, the reflector can be removed, allowing the light to radiate in all directions. Some light reaches the subject directly, but light reflecting off walls and ceiling helps soften the effect, lightening the shadows and adding depth.
4. Bounced flash
For soft natural-looking lighting, with good modeling features, the flash unit (whether on or off the camera) can be titled so that its light does not reach the subject directly but is reflected off a white or light-colored wall or a ceiling.
5. Flash off camera
When using a single light source, the best way to create appealing shadows and a three-dimensional feeling. The first flash is detached from the camera and held a distance of about a foot and a half above the camera and slightly to the right.
6. Multiple flash
This can be give the subject maximum three dimensionality by making him stand- out from the background. The main light came from an extension unit to the right; a second flash illuminated the background; a third unit on the camera lightened facial shadows.
AVOIDING COMMON MISTAKES WITH FLASH
It is difficult, particularly for beginners, to tell how the illumination cast by a flash will look until its too late. The light’s shadows and reflections are nonexistent until the pictures actually snapped, and even then they disappear so quickly they are hard to catch with the eye. The film catches them.
Shadows are a particular problem, especially in close-ups of people, because they are very noticeable when a single flash is aimed directly at the subject (rather than bounced off a reflecting surface). It is difficult to make shadows fall naturally unless the unit is removed from the camera and carefully aimed; this sometimes means that the flash must be mounted on a separate stand, or that on person must hold the flash while a second works the camera.
Unexpected reflections of the flash itself frequently pop up from shiny surfaces: metal, windowpanes, a mirror, the polished surfaces of furniture or paneled walls. If the subject wears eyeglasses, this may be a problem; they should be tilted slightly.
Flash illumination for color film calls for special precautions against “red-eye”. This phenomenon is a reflection of the flash from the bloo-rich retina inside the eye. It can be avoided if the subjects look away from the camera.
A flash held too high and too close to the subject casts deep, unnatural shadows, obscuring the forehead, the eyes and the chin. This error could easily be remedied by lowering the flash slightly and moving it to one side.
Subscribe to:
Posts (Atom)